Running Linux on Windows XP

If Linux runs on every architecture, why should another operating system be in its way?

Cooperative Linux is the first working free and open source method for optimally running Linux on Microsoft Windows natively. More generally, Cooperative Linux (short-named coLinux) is a port of the Linux kernel that allows it to run cooperatively alongside another operating system on a single machine.

For instance, it allows one to freely run Linux on Windows 2000/XP, without using a commercial PC virtualization software such as VMware, in a way which is much more optimal than using any general purpose PC virtualization software.

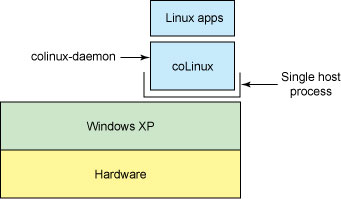
Unlike in other Linux virtualization solutions such as User Mode Linux (or the forementioned VMware), special driver software on the host operating system is used to execute the coLinux kernel in a privileged mode (known as ring 0 or supervisor mode).

coLinux is a port of the standard Linux kernel. In other words, coLinux is the Linux kernel that’s modified to run cooperatively with another operating system. The host operating system (Windows or Linux) maintains control of the physical resources of the operating system, while the guest operating system (coLinux) is provided with a virtual abstraction of the hardware. The host operating system must provide the means to execute a driver in the privileged ring (ring 0) and export the means to allocate memory

The root file system for coLinux is a regular file within the host operating system. To Windows it’s just a regular file, but to coLinux it’s an ext3 file system that can be read and written to..

To cooperatively share hardware with the host operating system, coLinux does not access I/O devices directly. Instead, it interfaces with emulated devices provided by the coLinux drivers in the host OS. For example, a regular file in Windows can be used as a block device in coLinux. All real hardware interrupts are transparently forwarded to the host OS, so this way the host OS’s control of the real hardware is not being disturbed and thus it continues to run smoothly.

Unlike User Mode Linux, coLinux always utilizes only one process of the host OS for all its Linux processes, privately managing their scheduling, resources, and faults in a manner which is contained and entirely independent of the way the host OS is implemented. In fact, coLinux only requires a very small set of commonly exported primitives from the host OS kernel in order to work, thus, it can be rather easily ported to run under any operating system, such as Solaris, or even Linux itself.

Download: here

Installation and Configuration of VMWare on Ubuntu Interpid (8.10)

1 – First, obtain a license from VMware here

2 – Install the following packages
apt-get install linux-source-2.6.27 linux-libc-dev xinetd

3 – Then, download VMware
wget http://download3.vmware.com/software/vmserver/VMware-server-1.0.8-126538.tar.gz
Untar: tar -xvzf VMware-server-1.0.8-126538.tar.gz
cd vmware-server-distrib/

4 – Run the installer
./vmware-install.pl
-> Answer yes to each question until it (run the configure script), to which reply “No

5 – Now, it is necessary to download the patch in order to build the kernel module (Tested with 2.6.27-7-generic)
wget http://www.insecure.ws/warehouse/vmware-update-2.6.27-5.5.7-2.tar.gz
tar -xvzf vmware-update-2.6.27-5.5.7-2.tar.gz
cd vmware-update-2.6.27-5.5.7-2
./runme.pl

-> Answer yes to all questions and press ENTER to use the default settings.

6 – Check whether the service is running

/etc/init.d/vmware status

Bridged networking on /dev/vmnet0 is running
Host-only networking on /dev/vmnet1 is running
Host-only networking on /dev/vmnet8 is running
NAT networking on /dev/vmnet8 is running
Module vmmon loaded
Module vmnet loaded


Recovering deleted file using Foremost

Ever deleted an important file? I haven’t recently done this on Linux, but when I used Windows I had a utility for recovering deleted files.

Foremost is a command line utility for finding and recovering deleted files based on their type. It was origionally developed for the US Air Force Office of Special Investigations.

How is this type of data recovery possible? When you delete a file, the data is not really overwritten. The pointer in the filesystem to the file is simply removed so the disk area can be overwritten when necessary. The more the disk is written to after the file is deleted, the larger the chance it will be overwritten and become unrecoverable.

I decided to test out Foremost in a virtual machine. First, I created some JPEG images, deleted them, and emptied the trash. Next, I shutdown the system and booted up the Ubuntu 8.04 Beta live-CD. Live-CDs don’t write to the hard disk, so they work well for data recovery.

To install in Ubuntu is rather simple, just issue the standard “sudo apt-get install foremost” command. You will have to check if you use another distro if it’s in your repositories, if not, the source can be grabbed at the link at the top of the screen and can be compiled – check this.

You need to know your target partition’s path to recover from it. You can simply start System-Administration->Partition Editor in Ubuntu, or use fdisk, Qtparted or any partition editor to see what discs are for what purpose. I saw the the home partition is /dev/sda1 on my machine.

Let’s recover some JPEG images:

sudo foremost -t jpeg -i /dev/sda1

Now the -t switch denotes that you’re looking for a file type. The -i switch denotes you’re looking on a particular device. This command causes Foremost to create a directory called output and put every file it can recover in. This could take a while.

Foremost isn’t the greatest solution; it recovers every file it sees and doesn’t support very many file types. It is possible to add types to the /etc/foremost.conf file, but it doesn’t look an easy task. However, if you’ve lost a bunch of photos or documents, Foremost could be just what you need.

Check out the man pages for more.

Creating Recycle Bin for Samba storage

I assume that you have successfully configure the samba server, if not, here is a quick and dirty samba configuration guide –  here

Samba is mainly used to share the files between Linux and windows and many times it happens that user deletes the file from the samba server and later wants to get back deleted files which is not possible with the default configuration of samba server.

The best option is to have a “Recycle bin” for every users on the samba server.
Here is an example of modifying the home directories of your users in samba configuration file

[homes]
comment = Home Directory
valid users = %S
browsable = no
guest ok = no
read only = no
vfs object = recycle
recycle:repository = RecycleBin
recycle:keeptree = yes
recycle:exclude = *.tmp, *.bak

The “vfs object” line calls in the plug-in that enables recycle bin capability.  On the other lines, you’re setting the name of the recycle bin directory, telling Samba to preserve the whole structure of any directories that a user may delete, and finally, telling it to not keep certain types of files.

Quick and Easy VNC Server setup

VNC, or Virtual Networked Computing, is a way of controlling a remote computer just as though you are sitting in front of it. In the Windows world it is also known as remote desktop but it’s normally referred to as VNC in the Linux world. All that happens is that you connect using a VNC client to a remote computer running the VNC server, then an image of the remote desktop is transmitted to your local computer and you can see and control the desktop just as though you are there since all keyboard and mouse commands are sent from your client machine to the server.

Step:1: Installation
First check if you already have them installed on your system, open a terminal and type:
$ rpm -qa | grep vnc
vnc-server-4.1.2-9.el5
If you get an output something like this then you’re all ready, if not you need to install them via yum.

Step 2 : Start the VNC server.
$ vncserver
……

New ‘server:1 (user)’ desktop is server:1

This will ask for password, you need to remember this password and need to provide it at the time of connecting to the server through VNC client.

Step 3 : Connecting from VNC client
From client run vncviewer   (dont run remote desktop connection from winxp or win2003 .they are using different protocol.)

In server enter : server:1
enter password: **********
And you will see the screen with one terminal open because by default vnc starts twm desktop.
For getting your gnome desktop
Go to folder /user/.vnc/ (user home directory) and open file xstartup using vi editor and uncomment or add the following lines
unset SESSION_MANAGER
exec /etc/X11/xinit/xinitrc
Restart the vncserver and connect to it using vncviewer, you should now see your default desktop, something like ..


Creating executable of Shell Script

Many times it happen that shell scripts that we write contains sensitive information like password or some sort of keys or path to some sensitive files and if you running such script it become very easy for the normal user to have a look inside the script and get the sensitive information from the code.
There is a program called “shc” which can provide the protection from such cases that developer wants.

shc itself is not a compiler such as cc, it rather encodes and encrypts a shell script and generates C source code with the added expiration capability. It then uses the system compiler to compile a stripped binary which behaves exactly like the original script. Upon execution, the compiled binary will decrypt and execute the code with the shell -c option. Unfortunatelly, it will not give you any speed improvement as a real C program would.

shc’s main purpose is to protect your shell scripts from modification or inspection. You can use it if you wish to distribute your scripts but don’t want them to be easily readable by other people.

Download shc (here) and untar it:
tar -xzvf shc-X.X.tgz
cd shc-X.X/
make
make install
This will install the shc binary on your box.

Create a file called: script.sh and add the following contents for testing purpose

############################### script.sh ##############################
#!/bin/sh
echo “This is a test shell script by Vijay”
############################### script.sh ##############################

Now run the command:
shc -f script.sh

The switch “-f” specifies the source script to encrypt. The above command will create two files: script.sh.x.c and script.sh.x. The encrypted shell script is: script.sh.x. Run that binary and see the output:

./script.sh.x
This is a test shell script by Vijay
Now you can distibute the script.sh.x without any fear

You can also specify a time limit on the shell script so that it will no longer execute after a certain date (expire) and you can specify a custom message to echo back to the user.

shc -e 09/12/2008 -m “Licence expire, please contact author – Vijay” -f script.sh
./script.sh.x
./script.sh.x has expired!
Licence expire, please contact author – Vijay

Check out the man pages for more info on “shc”.

Webmin installation and configuration on OpenSuSe

Webmin, developed by Jamie Cameron, acts as a comprehensive interface to the underlying applications on servers, including support for configuring applications like ftp, ssh, mail, Web, databases and more. Differing from other control panels, the core Webmin interface is intended for system administrators with root access to their servers, and includes a user-based package to enable your users (or clients) to access their own domains, email, and more, within a limited scope. Webmin supports running under SSL.

The application runs on its own mini-Web server so as to be available even when your primary Web server software is not running (i.e. Apache, etc.), and is powered by a number of Perl-based applications that directly interface with your system configuration files. According to Webmin, the entire solution is built on Perl 5 and uses no non-standard Perl modules.

Installing the RPM

You need to use RPM version of Webmin, first download the file and then run the command :

# rpm -ivh webmin-1.441-1.noarch.rpm

The rest of the install will be done automatically to the directory /usr/libexec/webmin, the administration username set to root and the password to your current root password. You should now be able to login to Webmin at the URL http://localhost:10000/

Configuring Your Firewall For Webmin

Many operating systems block access to port 10000 by default, as they have a firewall activated as part of the installation process. This may prevent you from logging into http://yourserver:10000/ from another system on your network or over the Internet.

The simplest way to open up port 10000 is to use one of the Webmin firewall management modules, such as Linux Firewall, BSD Firewall or IPFilter Firewall. However, to access this you’ll need to run a brower on the same system as Webmin, and access it via the URL http://localhost:10000/.

The alternative is to login as root via SSH, and manually edit the firewall configuration file. On Redhat and derived systems, this is /etc/sysconfig/iptables, while on Debian it is /var/lib/iptables. The line you need to add is :

-A INPUT -p tcp -m tcp –dport 10000 -j ACCEPT

It should be added in the file just after similar lines which grant access to ports 80, 22 and so on.

Once this line has been added, you will need to apply the firewall configuration. This is typically done with the command /etc/init.d/iptables restart .

Installing VMware on Ubuntu

VMware software provides a completely virtualized set of hardware to the guest operating system. VMware software virtualizes the hardware for a video adapter, a network adapter, and hard disk adapters. The host provides pass-through drivers for guest USB, serial, and parallel devices. In this way, VMware virtual machines become highly portable between computers, because every host looks nearly identical to the guest. In practice, a systems administrator can pause operations on a virtual machine guest, move or copy that guest to another physical computer, and there resume execution exactly at the point of suspension. Alternately, for enterprise servers, a feature called VMotion allows the migration of operational guest virtual machines between similar but separate hardware hosts sharing the same storage.

Download VMware

* wget http://download3.vmware.com/software/vmserver/VMware-server-1.0.8-126538.tar.gz

While you begin downloading VMware, register here to get the free serial key.

Also, install the following package:

* sudo apt-get install kernel-package xinetd

Now, unpack the VMware pacakage:

* tar zxvf VMware-server-1.0.8-126538.tar.gz
* cd vmware-server-directory

Run the installation script:

* sudo ./vmware-install.pl

Now you will get a series of questions that you need to answer and finally it will install the VMserver on your Ubuntu box.

Apache Configuration tool — Rapache

Rapache is a simple tool for remotely managing and configuring an apache2 instance without having to hassle around through configuration files.

Rapache is a python + GTK tool that allows you to configure apache2 and all of its modules.
GPL’d, Its goal is to provide the user with a simple interface to facilitate the work to those who want to set up a web-server in a few clicks.

Current Features:
– Vhost managing
– Virtualhost normalization to conform Debian policy
– Module managing
– Syntax highliting when showing confs source

Soon to come:
– Config files backup and quick restore
– Plugin system
– SSL Plugin, Basic_Auth plugin, Mono plugin, Logging Plugin
– Apache start/stop and status

Future:
– SSH Handling
– Localization

Download : here

How to create command aliases

Aliases in the Unix/Linux operating system provide shortcuts that can save you typing, let you build your own powerful commands, and make your command line life easier.

Background
I’ve found it very helpful to create aliases to make my command line Unix/Linux life easier. For instance, instead of always typing

ls -al

to get a directory listing, I’ve created an alias so I only have to type this: “l” (That’s the lower case letter “L”.)

Using aliases like this you can create anything from simple shortcuts like this to powerful custom commands.
How to create aliases

Creating aliases is very easy. You can either enter them at the command line as you’re working, or more likely, you’ll put them in one of your startup files, like your .bashrc file, so they will be available every time you log in.

I created the l alias above by entering the following command into my .bashrc file:

alias l=”ls -al”

As you can see, the syntax is very easy:

1. Start with the alias command
2. Then type the name of the alias you want to create
3. Then an = sign, with no spaces on either side of the =
4. Then type the command (or commands) you want your alias to execute when it is run. This can be a simple command, or can be a powerful combination of commands.

Sample aliases
To get you going, here is a list of sample aliases I use all the time. I’ve pretty much just copied them here from my .bashrc file:

alias l=”ls -al”
alias lm=”ls -al|more”
alias html=”cd /web/apache/htdocs/devdaily/html”
alias logs=”cd /web/apache/htdocs/devdaily/logs”
alias qp=”ps auxwww|more”
alias nu=”who|wc -l”
alias aug=”ls -al|grep Aug|grep -v 2002″

As you can see, you can get as creative as you want, and pipe commands together to do just about anything. In the last alias shown I’ve actually combined three Unix commands in a row into one alias to get the output I want.

Because the Unix shell is very programmable and because the output of commands is very consistent and reliable, you can create your own aliases (or macros if you prefer) to do just about anything.